Oh, let me tell you about my love affair with classic Italian bruschetta! It all started during my first trip to Tuscany, where I watched a nonna prepare this simple yet magical appetizer with such care. The smell of garlic toasting on crusty bread, the bright red tomatoes glistening with olive oil – it was love at first bite. Now, after years of making it (and eating way too much of it), I can confidently say this is one of those recipes where less is absolutely more.
What makes authentic bruschetta so special? It’s that perfect balance – the crunch of golden bread giving way to juicy, garlicky tomatoes, with fresh basil singing through every bite. And the best part? It comes together in minutes with just a handful of ingredients. No fancy techniques, no complicated steps – just pure Italian flavor that’ll transport you straight to a sun-drenched trattoria.
Why You’ll Love This Classic Italian Bruschetta
Let me count the ways this bruschetta will steal your heart (and probably become your new go-to appetizer):
- Quick magic: Ready in under 20 minutes – faster than ordering takeout!
- Fresh flavors: That gorgeous combo of ripe tomatoes, garlic, and basil tastes like summer on toast.
- No-fuss fancy: Looks impressive but couldn’t be simpler – my kind of party trick.
- Crowd-pleaser: I’ve yet to meet someone who doesn’t go back for seconds (or thirds…).
- Versatile: Perfect as is or ready for your creative twists (I’ll share my favorites later!).
Trust me, once you taste that crispy bread with the juicy tomato topping, you’ll understand why this recipe never leaves my entertaining rotation.
Ingredients for Classic Italian Bruschetta
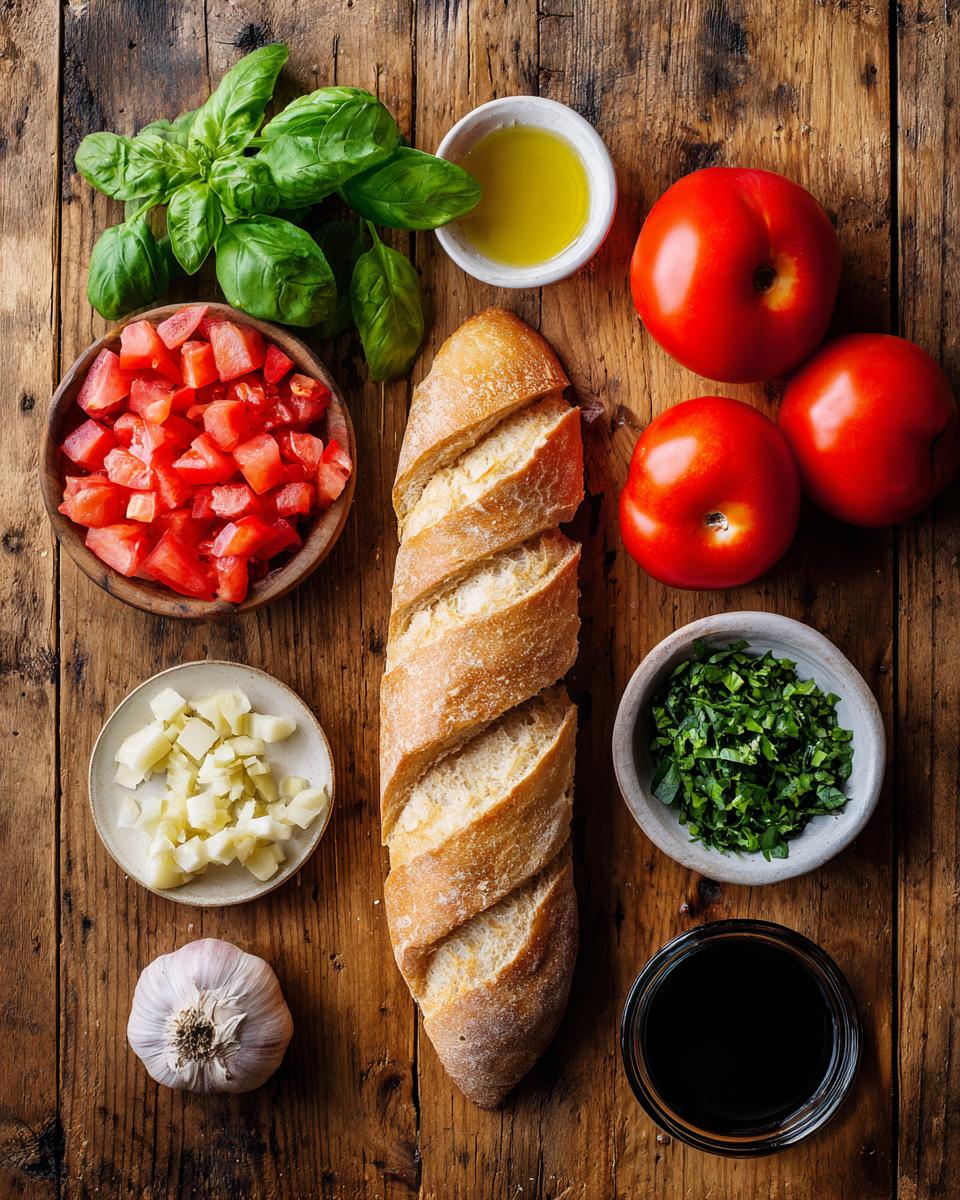
Here’s what you’ll need to make bruschetta that tastes like it came straight from a Roman trattoria. I’m picky about these ingredients – trust me, the quality makes all the difference!
- 1 French baguette or Italian bread – sliced ½-inch thick (day-old works great for extra crunch!)
- 4 ripe tomatoes – diced (about 2 cups – go for Roma or vine-ripened for best flavor)
- 2 cloves garlic – minced (plus 1 extra clove for rubbing if you’re feeling bold)
- ¼ cup fresh basil – chopped (please, please use fresh – dried just won’t sing the same way)
- 2 tbsp extra virgin olive oil – the good stuff you’d drizzle on salads
- 1 tbsp balsamic vinegar – adds that perfect tangy note
- Salt and pepper – to taste (I’m generous with both)
See? Nothing fancy – just fresh, simple ingredients that do all the talking. Now let’s make some magic!
Equipment You’ll Need
Okay, let’s talk tools! The beauty of bruschetta is that you don’t need any fancy equipment – just the basics that you probably already have in your kitchen. Here’s what I grab every time:
- Baking sheet – For toasting those bread slices to golden perfection. No need for anything special – your regular old sheet pan works great.
- Mixing bowl – Medium-sized is perfect for tossing together that gorgeous tomato mixture without making a mess.
- Sharp knife – A good chef’s knife makes quick work of dicing tomatoes and mincing garlic (and keeps your basil leaves looking pretty).
- Cutting board – Bonus points if it’s a big one so you’ve got room to work!
That’s seriously it! Though if you want to get fancy, I sometimes use:
- Pastry brush – For lightly coating the bread with olive oil before toasting (but your fingers work just fine too).
- Garlic press – If you’re lazy like me about mincing garlic (though truthfully, I think hand-minced tastes better).
See? No special gadgets required. Just simple tools for one of the simplest – and most delicious – appetizers around!
How to Make Classic Italian Bruschetta
Alright, let’s get to the fun part – making this gorgeous bruschetta! I promise it’s so easy you’ll wonder why you don’t make it every day. I’ll walk you through each step just like my Italian friend taught me years ago (with a few of my own hard-learned tips thrown in!).
Step 1: Toast the Bread
First things first – that perfect crispy base! Preheat your oven to 400°F (200°C) while you slice your baguette into ½-inch thick pieces. Don’t cut them too thin or they’ll burn, too thick and they won’t crisp properly – I like to eyeball it at about the width of my pinky finger.
Arrange the slices on a baking sheet in a single layer. If you’re feeling fancy, you can brush them lightly with olive oil (though I often skip this since we’re topping them anyway). Pop them in the oven for about 5-7 minutes until they’re golden and crisp around the edges. Give them a peek halfway through – if they’re browning unevenly, flip them over. That gorgeous toasty smell? That’s your cue they’re ready!
Step 2: Prepare the Tomato Topping
While the bread toasts, let’s make that irresistible tomato mixture. In a medium bowl, gently combine your diced tomatoes, minced garlic, and chopped basil. Here’s my secret – use your hands! It sounds silly, but gently tossing everything with your fingers keeps the tomatoes from getting mushed while making sure every piece gets coated.
Drizzle in the olive oil and balsamic vinegar, then season with salt and pepper. I start with about ½ teaspoon of salt and a few grinds of pepper, then taste and adjust. The flavors will intensify as it sits, so don’t overdo it at first. Let this mixture hang out while the bread finishes toasting – about 5 minutes is perfect for the flavors to get cozy.
Step 3: Assemble and Serve
Here comes the magic moment! Take your toasted bread slices and – if you’re extra like me – rub the top of each one with a cut garlic clove. It adds this incredible garlic aroma without overpowering the other flavors.
Spoon the tomato mixture generously onto each slice. Don’t be shy – pile it high! The juices will soak into the warm bread just slightly, creating that perfect texture contrast. Serve them immediately on a pretty platter, and watch them disappear faster than you can say “Mamma mia!”
One important tip: Only assemble what you’ll eat right away. Leftovers get soggy fast (though in my house, there are never leftovers to worry about!). If you need to prep ahead, keep the toasted bread and tomato mixture separate until serving time.
Tips for Perfect Classic Italian Bruschetta
After making this bruschetta more times than I can count (and eating even more of it!), I’ve picked up some foolproof tricks for absolute perfection every time. These little touches make the difference between good bruschetta and “oh-my-goodness-can-I-have-the-recipe” bruschetta!
Choose your bread wisely
That baguette isn’t just a vehicle for toppings – it’s half the magic! I always grab a slightly stale loaf (day-old is ideal) because it toasts up extra crisp. Fresh bread tends to soften too quickly under the juicy tomatoes. No stale bread? Just leave slices out for an hour before toasting – they’ll dry out just enough.
The garlic rub secret
Here’s my favorite trick: after toasting, take a peeled garlic clove and gently rub it over the warm bread. The heat releases the garlic’s oils, giving you incredible flavor without overwhelming bites of raw garlic. It’s subtle but makes all the difference – try it just once and you’ll never skip this step again!
Drain those tomatoes
After dicing, I let my tomatoes sit in a colander for about 10 minutes to drain excess juice. Too much liquid makes your bread soggy before it hits the table. Save that flavorful juice though – it’s amazing drizzled over the assembled bruschetta or whisked into salad dressings!
Season in stages
I salt my tomatoes twice – once after draining to draw out more moisture, then again right before serving. This builds layers of flavor without making things too salty. And always, always taste as you go – tomatoes vary wildly in sweetness!
Keep components separate until serving
Hosting a party? Toast the bread and prep the topping ahead, but don’t assemble until guests arrive. I arrange everything on pretty platters and let people build their own – it stays crisp and makes for such a fun presentation. Any leftovers keep better this way too!
With these simple tricks up your sleeve, you’ll be making bruschetta that would make Italian nonnas nod in approval. Trust me, once you taste the difference these small steps make, you’ll never go back to soggy, lackluster versions again!
Variations of Classic Italian Bruschetta
Oh, the possibilities! While I adore classic bruschetta, sometimes I love playing with different toppings. My absolute favorite twist? Adding fresh mozzarella pearls right on top – the creamy cheese with the bright tomatoes is unreal. For meat lovers, a few slices of crispy prosciutto take it to another level. Vegetarian? Try roasted red peppers or kalamata olives for extra texture. And my vegan friends – skip the cheese and add avocado or a drizzle of balsamic glaze instead. The best part? These variations all come together just as quickly as the original!
Serving Suggestions for Classic Italian Bruschetta
Okay, let’s talk about how to make your bruschetta the star of the show! This isn’t just an appetizer – it’s the perfect opening act for so many meals. My favorite way? Serve it with a crisp Pinot Grigio or a chilled Prosecco. The bright acidity cuts through the rich olive oil beautifully. For a casual gathering, I’ll arrange a big platter of bruschetta alongside some cured meats, olives, and cheeses – instant antipasto perfection!
Dinner party coming up? Start with bruschetta before serving a big bowl of pasta – it gets everyone’s appetites going without filling them up too much. And here’s my secret brunch trick: serve mini bruschetta alongside scrambled eggs and crispy bacon. The fresh tomato topping makes the whole meal feel fancier somehow. Honestly? I’ve been known to eat a pile of bruschetta with a simple green salad for lunch and call it a perfect meal. However you serve it, just make sure there’s plenty to go around – this stuff disappears fast!

Storage and Reheating
Listen, I’ll be honest – bruschetta is always best fresh. But life happens, and sometimes you need to prep ahead or deal with leftovers (though in my house, that’s rare!). Here’s how I handle storage without sacrificing that perfect texture:
Storing the components separately
The golden rule? Never store assembled bruschetta! That tomato topping will turn your lovely crispy bread into mush in no time. Instead, keep everything in separate containers in the fridge. The tomato mixture stays fresh in an airtight container for about 2 days – just give it a quick stir before using. The bread? Leave it at room temperature in a paper bag (plastic makes it sweat and get chewy). It’ll stay crisp for about a day this way.
Reviving leftover bread
If your toasts lose their crunch, don’t panic! Pop them back in a 350°F oven for 3-4 minutes to crisp up again. No oven? A quick toast in a dry skillet works in a pinch. But here’s my secret – I often intentionally make extra toasted bread to have on hand. It’s perfect for quick snacks – just top with whatever’s in the fridge!
What about freezing?
I don’t recommend freezing the assembled bruschetta, but you can absolutely freeze the toasted bread slices. Just let them cool completely, then store in a freezer bag with all the air squeezed out. They’ll keep for about a month. When you’re ready, reheat them straight from frozen in a 375°F oven for 5 minutes – good as new!
Remember, the tomato topping doesn’t freeze well (those poor tomatoes turn to mush), but it’s so quick to make fresh anyway. My advice? Make just enough topping for immediate serving, toast extra bread, and enjoy the leftovers as garlic toast with soups or pasta later in the week!
Nutritional Information for Classic Italian Bruschetta
Now, I’m no nutritionist, but I can tell you this – when you’re using fresh, wholesome ingredients like we do in this bruschetta, you’re already winning! Of course, exact numbers will vary depending on your specific ingredients (especially that olive oil – I always use a generous pour!).
What I love about this recipe is how naturally balanced it is. You’ve got your carbs from that crusty bread, healthy fats from the olive oil, and plenty of vitamins from the fresh tomatoes and basil. The garlic? Well, that’s just there to make everything taste amazing while possibly warding off vampires – bonus!
If you’re watching certain dietary needs, here’s the general picture: each piece is relatively light but packed with flavor. The bread gives you energy, while the tomato topping adds hydration and nutrients without weighing you down. It’s naturally vegetarian and can easily be made vegan (just skip any cheese toppings).
Remember, these are estimates – your exact nutrition will depend on factors like your bread’s thickness, how juicy your tomatoes are, and how much olive oil makes it into the bowl (I confess, mine probably gets an extra glug or two!). But honestly? When something tastes this fresh and delicious, I try not to overthink the numbers.
Frequently Asked Questions
Over the years, I’ve gotten so many great questions about making perfect bruschetta. Here are the ones that come up most often – along with my tried-and-true answers!
Can I use canned tomatoes instead of fresh?
While you can use good-quality canned tomatoes in a pinch, fresh really is best for classic bruschetta. That said, if it’s the middle of winter and your grocery store tomatoes look sad, drained canned San Marzano tomatoes work surprisingly well. Just pat them extra dry before using!
How long does bruschetta last after making it?
Assembled bruschetta should be eaten immediately (not that this is ever a problem in my house!). But here’s the trick – store the toasted bread and tomato topping separately, and they’ll keep for about 2 days in the fridge. The bread might need a quick re-toast, but the flavors will still be amazing!
Can I make bruschetta ahead of time for a party?
Absolutely! I do this all the time. Prep everything up to 4 hours ahead – toast the bread, make the tomato mixture (keep it chilled), then assemble right before serving. In fact, letting the tomato mixture sit for an hour or two actually improves the flavors – just drain any extra liquid right before topping.
Why does my bruschetta get soggy so fast?
Ah, the eternal struggle! The culprit is usually too much tomato juice. My fixes: 1) Drain diced tomatoes for 10 minutes before mixing 2) Don’t over-salt the topping (it draws out moisture) 3) Use slightly stale, well-toasted bread 4) Assemble just before serving. Follow these steps and you’ll get that perfect crisp-every-bite texture!
What’s the best bread alternative for gluten-free bruschetta?
I’ve had great success with sturdy gluten-free baguettes from the freezer section – toast them extra crispy! For a low-carb option, thick slices of roasted eggplant or zucchini work surprisingly well. Just brush with oil, roast until tender, then top as usual. Not traditional, but delicious!
Print
Classic Italian Bruschetta Recipe
A simple and flavorful Italian appetizer featuring toasted bread topped with fresh tomatoes, garlic, and basil.
- Total Time: 17 minutes
- Yield: 12 pieces 1x
Ingredients
- 1 French baguette or Italian bread, sliced
- 4 ripe tomatoes, diced
- 2 cloves garlic, minced
- 1/4 cup fresh basil, chopped
- 2 tbsp extra virgin olive oil
- 1 tbsp balsamic vinegar
- Salt and pepper to taste
Instructions
- Preheat your oven to 400°F (200°C).
- Arrange the bread slices on a baking sheet and toast for 5-7 minutes until golden.
- In a bowl, mix diced tomatoes, minced garlic, chopped basil, olive oil, and balsamic vinegar.
- Season the tomato mixture with salt and pepper to taste.
- Spoon the tomato mixture onto the toasted bread slices.
- Serve immediately.
Notes
- Use fresh, ripe tomatoes for the best flavor.
- You can rub the toasted bread with a garlic clove for extra garlic flavor.
- Add a sprinkle of grated Parmesan cheese if desired.
- Prep Time: 10 minutes
- Cook Time: 7 minutes
- Category: Appetizer
- Method: Toasting
- Cuisine: Italian
- Diet: Vegetarian
Nutrition
- Serving Size: 1 piece
- Calories: 80
- Sugar: 2g
- Sodium: 120mg
- Fat: 3g
- Saturated Fat: 0.5g
- Unsaturated Fat: 2.5g
- Trans Fat: 0g
- Carbohydrates: 12g
- Fiber: 1g
- Protein: 2g
- Cholesterol: 0mg