Oh my gosh, you have to try these Cheeseburger Eggrolls – they’re my go-to crowd-pleaser for game nights and potlucks! I stumbled upon this recipe when my kids begged for “something fun” with our burgers, and wow, did we strike gold. Imagine all that juicy beef, melty cheddar, and just the right kick of Worcestershire sauce wrapped up in a crispy shell. They’re like your favorite burger decided to put on its fancy pants! After testing dozens of variations (my neighbors still thank me for the “research”), this version nails the perfect balance of crunch and flavor every single time.
Ingredients for Cheeseburger Eggrolls
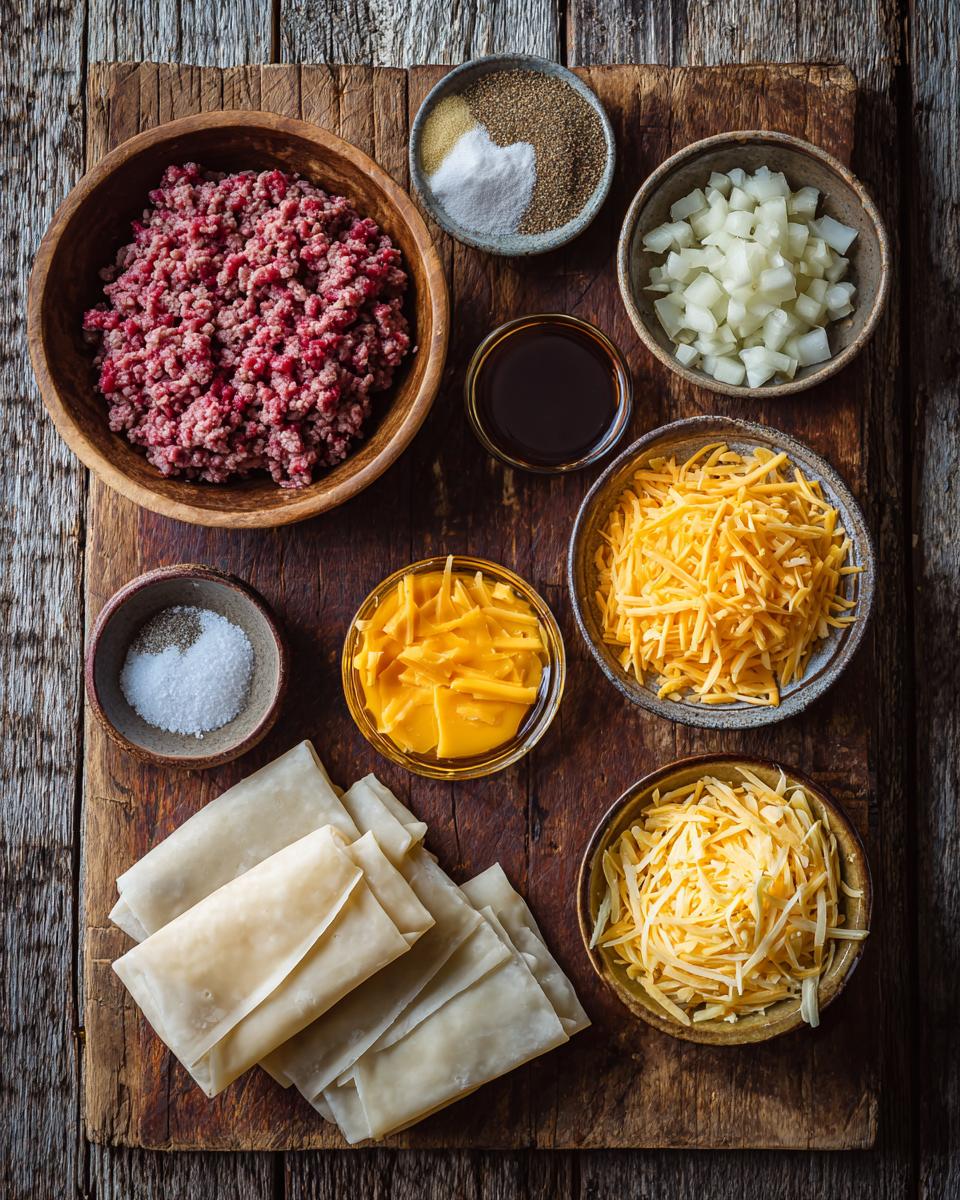
Here’s the beauty of this recipe – you probably already have most of these ingredients in your kitchen right now! I love how simple the shopping list is for something that tastes so impressive. Just a quick tip before we dive in: measure everything before you start cooking. Trust me, you don’t want to be frantically shredding cheese while your beef is browning (learned that hard way).
- 1 lb ground beef – I use 80/20 for the best flavor, but leaner works too
- 1 small onion, finely diced – About 1/2 cup, and yes, the finer the better so it cooks evenly
- 1 tsp garlic powder – My secret weapon for that classic burger taste
- 1 tsp Worcestershire sauce – That “what is that amazing flavor?” ingredient
- 1 cup packed shredded cheddar cheese – Sharp cheddar is my favorite, but any melty cheese works
- 12 eggroll wrappers – Look for the square ones in the refrigerated section
- 1 tbsp oil for frying – Vegetable or canola oil both work great
- Salt and pepper to taste – I do about 1/2 tsp salt and 1/4 tsp pepper
See? Nothing fancy, just good ingredients that come together in the most magical way. One quick note – make sure your eggroll wrappers are thawed if frozen. I’ve definitely tried to pry apart frozen ones in a time crunch (not pretty). Now let’s get cooking!
How to Make Cheeseburger Eggrolls
Okay, let’s turn these simple ingredients into something magical! I promise it’s easier than you think. The first time I made these, I was shocked at how professional they looked – and the smell? Oh my goodness, your kitchen is about to smell like the best burger joint in town. Just follow these steps and you’ll be snacking on crispy, cheesy goodness in no time.
Step 1: Prepare the Filling
First things first – let’s get that filling going! Grab your favorite skillet (I always use my trusty cast iron) and heat it over medium heat. No oil needed yet – we’re going to let the beef do its thing. Add your ground beef and break it up with a wooden spoon. You want nice little crumbles, not big chunks.
Now here’s the important part – don’t rush the onions! Once the beef is about halfway cooked (you’ll see some pink still), toss in those finely diced onions. Keep stirring and cooking until there’s absolutely no pink left in the meat and the onions turn nice and soft. This usually takes about 5-7 minutes total.
Time for flavor magic! Sprinkle in the garlic powder, Worcestershire sauce, salt, and pepper. Give it one last good stir, then take it off the heat. Don’t skip this next part – let it cool for about 5 minutes before adding the cheese. If you dump cheese into piping hot beef, you’ll end up with a greasy mess instead of that perfect melty goodness.
Step 2: Assemble the Eggrolls
Now the fun begins! Set up your wrapping station with the eggroll wrappers, filling, and a small bowl of water. Keep a slightly damp towel over your wrappers – they dry out faster than you’d think. Place one wrapper diagonally (like a diamond) in front of you.
Scoop about 2 tablespoons of filling onto the bottom third of the wrapper. Here’s my pro tip: leave about an inch of space at the bottom point – this gives you room to start rolling. Fold that bottom point up over the filling, tucking it in snugly. Then fold in the sides (like you’re making an envelope) before rolling it up tightly.
Dip your finger in water and wet the top point before finishing the roll – this acts as edible glue to seal everything shut. Press gently but firmly. If you see any filling trying to escape, just tuck it back in and re-seal. No perfection needed here – my first few always look a little wonky but taste just as amazing!
Step 3: Cook the Cheeseburger Eggrolls
Alright, crunch time! Heat your oil in that same skillet over medium heat. You’ll know it’s ready when a tiny piece of wrapper sizzles immediately. Carefully add a few eggrolls at a time – don’t crowd the pan or they’ll steam instead of getting crispy.
Now the hardest part – patience! Let them cook for about 2-3 minutes per side until they’re beautifully golden brown. I like to use tongs to gently turn them. You’ll hear that satisfying sizzle and smell that incredible aroma. When they’re done, transfer them to a plate lined with paper towels to drain.
If you’re baking instead of frying, no problem! Just brush them lightly with oil and bake at 400°F for about 15 minutes, flipping halfway. They won’t get quite as dark, but they’ll still be deliciously crispy. Either way, let them cool for just a minute or two before diving in – that cheese stays molten hot!

Tips for Perfect Cheeseburger Eggrolls
After making these cheeseburger eggrolls more times than I can count (my family’s obsession is real), I’ve picked up some tricks that’ll guarantee success every time. These little nuggets of wisdom come from all my kitchen mishaps – consider them your shortcut to eggroll mastery!
Keep those wrappers happy
Eggroll wrappers can be divas if you let them dry out. I always keep a slightly damp paper towel over my stack while working. If one does dry out before you use it? No worries – just brush it lightly with water and wait a minute. It’ll become pliable again like magic!
And here’s my secret weapon: work on a clean, slightly damp cutting board. The moisture helps the wrappers grip just enough to roll perfectly without sticking. Trust me, this small step makes all the difference when you’re trying to get that tight roll.
Temperature matters more than you think
That filling needs to cool just enough before you add the cheese – I aim for warm but not hot. Too hot and your cheese turns into an oily puddle (been there). Too cold and it won’t melt properly inside the eggroll. The sweet spot? When you can comfortably stick your finger in the mixture for a few seconds.
Same goes for frying temperature! If your oil’s too hot, the wrappers brown before the filling heats through. Too cool and they’ll soak up oil instead of crisping. I test with a small piece of wrapper – it should sizzle immediately but not burn.
Seal like a pro
Nothing’s sadder than watching precious filling ooze out in the fryer (RIP, my first batch). Here’s how I prevent leaks: after rolling, press along the seams firmly with your fingers. Then do a quick “pinch and press” along the entire length – this double-seal method hasn’t failed me yet!
If you’re really worried, mix a teaspoon of cornstarch with your sealing water to make edible superglue. Just don’t overdo it or your wrappers get gummy. A little goes a long way!
The golden rule of frying
Don’t crowd your pan! I know it’s tempting to cook them all at once, but giving each eggroll some personal space means they’ll crisp up beautifully instead of steaming. I do batches of 4-5 in my 12-inch skillet – the wait is worth it when you hear that perfect crunch.
And here’s my weirdest tip: after frying, prop them upright in a wire rack or against something for a minute. This lets any excess oil drain from the bottom so they stay crispy longer. My husband laughed when he first saw me do this… until he tasted the results!
Variations for Cheeseburger Eggrolls
One of my favorite things about this recipe is how easily you can make it your own! Over the years, I’ve played around with dozens of variations – some were hits (hello, bacon cheeseburger eggrolls!), and some… well, let’s just say my kids still tease me about the “blue cheese incident.” Here are my absolute favorite twists that always get requested at family gatherings.
Meat Swaps That Actually Work
Ground turkey lovers, rejoice! You can absolutely substitute it 1:1 for the beef – just add an extra teaspoon of Worcestershire sauce to boost the flavor. My neighbor Sarah swears by using half beef, half spicy Italian sausage (and she’s not wrong). For a vegetarian version, crumbled mushrooms sautéed with soy sauce and smoked paprika make an amazing meaty substitute.
Cheese Adventures
While sharp cheddar will always have my heart, pepper jack cheese adds the perfect kick if you like things spicy. For game days, I’ll mix in some blue cheese crumbles with the cheddar – about 1/4 cup does the trick without overpowering. And if you’re feeling fancy? Gruyère transforms these into something seriously gourmet.
Mix-In Madness
Here’s where you can really get creative! Diced pickles stirred into the filling add that classic burger tang (just pat them dry first). Jalapeños – fresh or pickled – give a nice heat boost. My husband’s favorite version includes crispy bacon bits mixed right into the filling. And for a Philly cheesesteak twist? Sautéed bell peppers and mushrooms with provolone cheese!
Dipping Sauce Experiments
While ketchup and mustard are classics, don’t stop there! My current obsession is mixing equal parts ranch dressing and barbecue sauce – it’s ridiculously good. For something different, try thousand island dressing or spicy mayo (just mayo with sriracha to taste). And if you’re serving these at parties? Set up a “dip bar” with small bowls of different sauces – it’s always a hit!
The beauty of these cheeseburger eggrolls is how forgiving they are. Once you’ve mastered the basic technique, the flavor possibilities are endless. My only rule? Whatever variations you try, make sure to write them down – you’ll want to recreate the winners!
Serving Suggestions for Cheeseburger Eggrolls
Now that you’ve made these golden beauties, let’s talk about the best ways to serve them! I’ve hosted enough game nights and potlucks to know presentation matters almost as much as taste. Here’s how I like to turn these cheeseburger eggrolls into a showstopper that’ll have everyone asking for your recipe.
Dipping Sauces That Steal the Show
Ketchup and mustard are classic for a reason – they’re the perfect tangy contrast to that rich, cheesy filling. But don’t stop there! My current obsession is mixing equal parts mayo and sweet pickle relish for a quick thousand island-style sauce. For spicy lovers, blend ranch dressing with a squirt of sriracha – the cool creaminess tames the heat just right.
Here are my go-to dipping options when I want to impress:
- Burger sauce: Mix ketchup, mayo, mustard, and a dash of garlic powder
- Spicy honey mustard: Whisk Dijon with honey and a pinch of cayenne
- Cheese sauce: Melt Velveeta with a splash of milk for ultimate indulgence
- Avocado crema: Blend ripe avocado with sour cream and lime juice
Side Dishes That Complete the Meal
While these eggrolls are stars on their own, pairing them with the right sides turns them into a full meal. My kids always beg for crispy french fries – the salty crunch plays off the rich filling perfectly. For something lighter, a simple chopped salad with iceberg, tomato, and red onion (just like burger toppings!) dressed with vinaigrette balances everything beautifully.
When I’m feeling fancy, I’ll serve them with:
- Sweet potato fries dusted with smoked paprika
- Creamy coleslaw for that classic burger stand vibe
- Pickle spears and onion rings for extra crunch
- Baked beans when I’m channeling backyard barbecue energy
Presentation That Wows
Here’s my secret for parties: arrange the eggrolls standing up in a tall glass or mason jar lined with parchment paper. Not only does it look adorable, but it keeps them crispy longer! For a fun twist, slice them diagonally and fan them out on a platter with small bowls of different sauces in the center. Trust me, your guests will swarm it like bees to honey.
No matter how you serve them, make sure they’re piping hot – that cheese pull is half the magic! Just be careful – I’ve burned my fingers one too many times because I couldn’t wait to dig in. Now go forth and enjoy your cheeseburger eggrolls – you’ve earned every crispy, cheesy bite!
Storage and Reheating Instructions
Let’s be real – leftovers rarely happen with these cheeseburger eggrolls in my house (my teenagers inhale them!). But on the off chance you have some to save, here’s how to keep them tasting just as amazing as when they first came out of the pan. I’ve tried every storage trick in the book, and these methods actually work!
The Best Way to Store Leftovers
First rule: let them cool completely before storing – no one wants a soggy eggroll from trapped steam! I spread mine out on a baking sheet for about 15 minutes first. Then, line an airtight container with paper towels (this absorbs any excess oil) and arrange the eggrolls in a single layer. If you need to stack them, put another paper towel between layers. They’ll keep in the fridge for 3-4 days this way.
For longer storage, freeze them on a baking sheet until solid (about 2 hours), then transfer to a freezer bag with as much air squeezed out as possible. They’ll stay good for up to 3 months frozen. No thawing needed when you’re ready to reheat!
Reheating Like a Pro
Microwaving is tempting, but trust me – it turns these beauties into sad, limp versions of themselves. Instead, use your oven or air fryer to bring back that glorious crunch. Here’s my foolproof method:
Oven method: Preheat to 375°F. Place eggrolls on a wire rack over a baking sheet (this lets air circulate all around). Bake for 8-10 minutes if refrigerated, 12-15 if frozen – you’ll hear them start to sizzle when they’re ready!
Air fryer method: My absolute favorite! Arrange eggrolls in a single layer at 375°F for 3-4 minutes if refrigerated, 5-6 minutes if frozen. No need to flip – the circulating air crisps them evenly on all sides.
Either way, they’re done when they’re piping hot inside and crispy outside. Pro tip: if they’re looking a little dry after reheating, a quick spritz of oil before cooking helps bring back that fresh-fried texture. Serve immediately – that cheese waits for no one!
Creative Uses for Leftovers
Got some that didn’t crisp up perfectly after storage? Don’t toss them! Chop them up and toss with greens for an epic burger salad, or crumble over nachos for the ultimate game day snack. My kids love when I slice leftover eggrolls into “coins” and use them as burger toppers – it’s like cheeseburger inception!
Nutritional Information for Cheeseburger Eggrolls
Okay, let’s talk numbers – but keep in mind, these are just ballpark figures based on how I typically make my cheeseburger eggrolls. Your exact count might dance around these numbers depending on the brands you use or if you tweak the recipe (like I know you will!). I’m sharing this because I always want to know what I’m eating, but remember – sometimes deliciousness trumps perfect nutrition!
- Serving Size: 1 eggroll (about 2.5 oz)
- Calories: ~180
- Total Fat: 10g (4g saturated)
- Cholesterol: 35mg
- Sodium: 320mg
- Total Carbohydrates: 12g
- Fiber: 1g
- Sugars: 1g
- Protein: 12g
A few important notes: these values assume you’re using 80/20 ground beef and frying in about 1 tablespoon of oil (with proper draining). If you bake instead of fry or use leaner meat, you’ll knock off some calories and fat. And hey – that protein count isn’t bad for such a tasty snack!
Nutrition can vary a lot based on:
- How much oil your eggrolls actually absorb during frying
- The exact cheese and beef percentages you use
- Whether you add any extra ingredients from the variations
- Your specific brand of eggroll wrappers
At the end of the day, these are meant to be an occasional indulgence – not health food! I like to balance them out with a big salad when I’m being “good.” But let’s be honest… sometimes you just need that crispy, cheesy goodness without overthinking it too much!
FAQ About Cheeseburger Eggrolls
Over the years, I’ve gotten tons of questions about these cheeseburger eggrolls from friends and family (and even some curious neighbors who smelled them cooking!). Here are the answers to all the common questions I get – consider this your cheat sheet for eggroll success!
Can I bake these instead of frying?
Absolutely! I bake them when I want to feel slightly more virtuous. Just brush them lightly with oil (I use a spray bottle for even coverage) and bake at 400°F for about 15 minutes, flipping halfway. They won’t get quite as golden as fried ones, but they’ll still be deliciously crispy. Pro tip: place them on a wire rack over the baking sheet for maximum crunch!
Can I make cheeseburger eggrolls ahead of time?
You sure can – in fact, I often prep them up to the frying stage the night before parties. Just assemble them, place on a parchment-lined tray, cover tightly with plastic wrap, and refrigerate. When you’re ready, fry or bake them straight from the fridge (add a minute or two to cooking time). You can even freeze unbaked eggrolls for up to 3 months – cook from frozen, no thawing needed!
What’s the best dipping sauce for cheeseburger eggrolls?
Oh, the possibilities! While classic ketchup and mustard are always winners, my current obsession is mixing equal parts barbecue sauce and ranch dressing – it’s ridiculously good. For something different, try:
- Spicy mayo (mayo + sriracha)
- Thousand island dressing
- Cheese sauce (Velveeta + milk)
- Avocado crema (blended avocado + sour cream)
The key is matching the sauce to your mood – sometimes simple is best!
Why did my eggrolls split open while frying?
Ah, the great eggroll explosion – happened to me too at first! Usually it’s because:
- The filling was too wet (make sure to drain any excess grease)
- You overfilled the wrappers (stick to 2 tablespoons max)
- The seal wasn’t tight enough (that water “glue” is crucial!)
Don’t worry – even split eggrolls still taste amazing… they’re just “rustic” looking!
Can I use different meats in cheeseburger eggrolls?
Definitely! Ground turkey works great (add extra Worcestershire), and I’ve even used ground chicken with excellent results. For a fun twist, try half beef, half spicy sausage – it gives an amazing depth of flavor. Vegetarian? Sautéed mushrooms with smoked paprika make a surprisingly meaty substitute.
How do I prevent soggy eggrolls?
Three words: drain, cool, and space. Drain the cooked beef well, let the filling cool slightly before adding cheese, and don’t crowd them when frying. Oh, and always transfer cooked eggrolls to a wire rack or paper towels immediately – letting them sit in oil is a crispy catastrophe waiting to happen!
Got more questions? Drop them in the comments – I’m always happy to share more cheeseburger eggroll wisdom from all my kitchen adventures (and misadventures) with this recipe!
Print
Cheeseburger Eggrolls
Crispy eggrolls stuffed with savory cheeseburger filling—perfect for a fun twist on classic flavors.
- Total Time: 25 mins
- Yield: 12 eggrolls 1x
Ingredients
- 1 lb ground beef
- 1 small onion, diced
- 1 tsp garlic powder
- 1 tsp Worcestershire sauce
- 1 cup shredded cheddar cheese
- 12 eggroll wrappers
- 1 tbsp oil for frying
- Salt and pepper to taste
Instructions
- Brown the ground beef in a pan over medium heat.
- Add diced onion, garlic powder, Worcestershire sauce, salt, and pepper. Cook until onions soften.
- Remove from heat and stir in cheddar cheese.
- Place 2 tbsp of filling onto each eggroll wrapper. Fold sides inward, then roll tightly.
- Heat oil in a pan and fry eggrolls until golden brown, about 2-3 minutes per side.
- Drain on paper towels and serve warm.
Notes
- For a crispier texture, bake at 400°F for 15 minutes instead of frying.
- Substitute ground turkey for a lighter option.
- Serve with ketchup or mustard for dipping.
- Prep Time: 15 mins
- Cook Time: 10 mins
- Category: Appetizer
- Method: Frying
- Cuisine: American
- Diet: Low Lactose
Nutrition
- Serving Size: 1 eggroll
- Calories: 180
- Sugar: 1g
- Sodium: 320mg
- Fat: 10g
- Saturated Fat: 4g
- Unsaturated Fat: 5g
- Trans Fat: 0g
- Carbohydrates: 12g
- Fiber: 1g
- Protein: 12g
- Cholesterol: 35mg